
PureChill PWC-900/NFM
Quick start guide
To enable quick install, do the following steps:
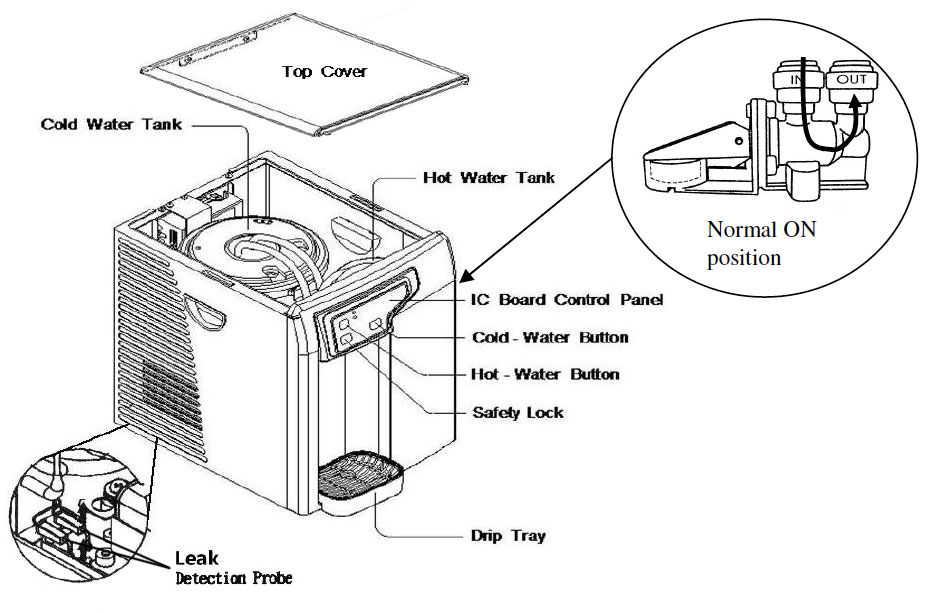
- Connect ¼” feed water tubing from feed water connection to inlet bulkhead on back of cooler.
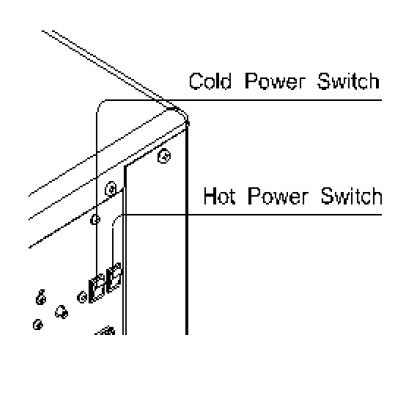
- Check that Hot and Cold power switched are in OFF position on back of cooler
3. Plug power cord into electrical outlet. (DO NOT turn on Hot or Cold power at this point)
Cooling chamber fill valve will automatically open allowing water to fill the cooling chamber until full (about 30-60 seconds). Valve will then close automatically.
NOTE: The chilling chamber has a re-circulation pump that will run automatically when unit is plugged in. The pump may make noise until the chilling chamber is full of water.
Prime Cooler for Water Dispense
4. Prime Cold Water Dispense: Prime for dispense by pressing and holding Cold dispense button on until water flow commences from dispense spigot. (about 5-10 seconds) Once Water flow has begun, start and stop water flow several times in a row to fully ‘wet’ interior dispensing tubes and help purge any air from system for best dispensing performance.
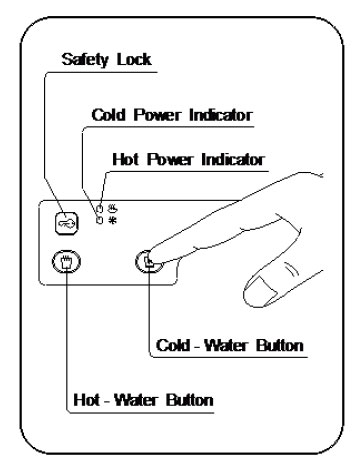
5. Prime Hot Water Dispense: Prime for dispense by pressing and holding HOT LOCK button until beep sound is heard ( 1 second) then pressing and holding Hot dispense button on until water flow commences from dispense spigot. This will take longer (about 1 minute) as the heating tank must fill completely before dispensing will commence. Once Water flow has begun, start and stop water flow several times in a row to fully ‘wet’ interior dispensing tubes and help purge any air from system for best dispensing performance.
Time-Out Safety Feature
This model is equipped with a dispense time-out feature. If either dispense button is held on for more than 60 seconds, dispensing solenoid will shut-off automatically, 3 beeps will sound and water will stop flowing. To continue dispensing simply release and re-press dispense button.
System Flush
It is recommended to flush both the cold and hot systems by dispensing 16-32 ounces of water out of each First press and hold cold dispense button until 16-32 oz. have been dispensed. Then do the same for the hot dispense.
Once the system has been flushed Turn on Hot and Cold power switches. Heating and Cooling will system will now operate automatically.
Leak Detection System
This model has 2 leak detection systems built in. One is a mechanical leak valve installed on inlet water line and mounted inside the cabinet at the base on the Right Hand Side. The other is electronic sensor located in the base at the rear of the Left Hand Side (see below)
Mechanical Leak Valve
If water leaks to the base of the cooler cabinet on the Right Hand Side or from the built-in filters (if supplied), the mechanical leak detector valve will close and shut off the feed water to the filters and the rest of the cooler.
To access the mechanical leak valve remove the 2 screws from the rear of the Right Hand Side panel and slide the panel back. To Reset after a leak:
- Remove any excess water in the bottom compartment
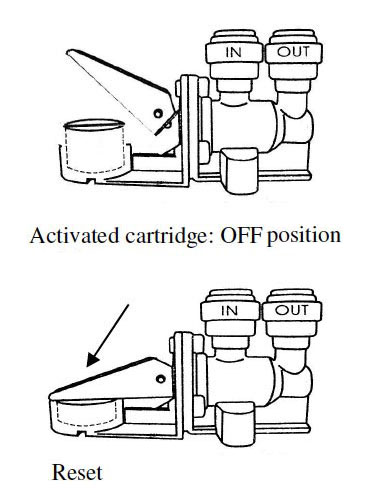
- Reset the leak valve by replacing expanded activation cartridge with new cartridge (a spare activation sponge is supplied with the cooler)
- Reset leak valve to open/ON position by pressing lever down
NOTE: It is not necessary to remove the plastic wrapping from the replacement cartridge– install with bevel side down.
Electronic Leak Sensor
The electronic water leak detection system is installed in the rear left had corner of the cooler. If a water leak should occur inside the cooler and water collects in the leak probe tray the power will automatically be shut off.
When power is cut off due to water leak:
- Un-plug the cooler and remove the left side panel by removing the 2 screws and sliding the panel back.
- Remove any excess water in the bottom, lift and wipe the detection probes dry. Replace Leak sensors
- Re-connect power to reset the leak controller in the unit and check for leaks.