PureChill PWC-450STA
Quick start guide
To enable quick install, do the following steps:
- Connect ¼” feed water tubing from feed water connection to inlet bulkhead on back of cooler.
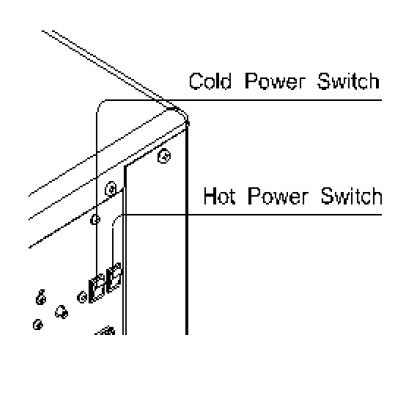
- Check that Hot and Cold power switched are in OFF position on back of cooler

- Plug the power cord into an electrical outlet. (DO NOT turn on Hot or Cold power at this point)
NOTE: The model PWC-450STA does not automatically fill with water, it must be plugged into power to enable filling and dispensing of water
Prime Cooler for Water Dispense
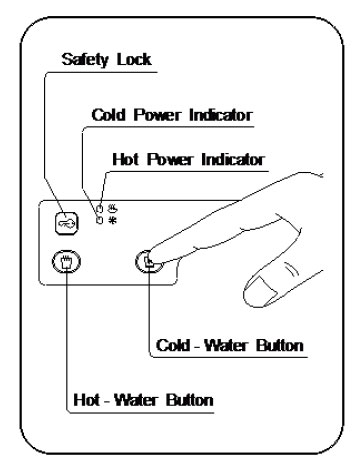
- Prime Cold Water Dispense: Prime for dispense by pressing and holding Cold dispense button ON until water flow commences from dispense spigot. Water will fill cold tank and dispense after about 1-3 minutes depending on incoming water pressure. Once Water flow has begun, start and stop water flow several times in a row to fully ‘wet’ interior dispensing tubes and help purge any air from system for best dispensing performance.

- Prime Hot Water Dispense: Prime for dispense by pressing and holding HOT LOCK button until beep sound is heard ( 1 second) then pressing and holding Hot dispense button ON until water flow commences from dispense spigot. (about 1-3 minute depending on incoming water pressure) as the heating tank must fill completely before dispensing will commence. Once Water flow has begun, start and stop water flow several times in a row to fully ‘wet’ interior dispensing tubes and help purge any air from system for best dispensing performance.
Time-Out Safety Feature:
This model is equipped with a dispense time-out feature. If either dispense button is held ON for more than 60 seconds, dispensing solenoid will shut-off automatically, 3 beeps will sound and water will stop flowing. To continue dispensing simply release and re-press dispense button.
System Flush
It is recommended to flush both the cold and hot systems by dispensing 16-32 ounces of water out of each.
First press and hold cold dispense button until 16-32 oz. have been dispensed. Then do the same for the hot dispense.
Once the system has been flushed Turn on the Hot and Cold power switches. The Heating and Cooling will system will now operate automatically
Leak Detection System
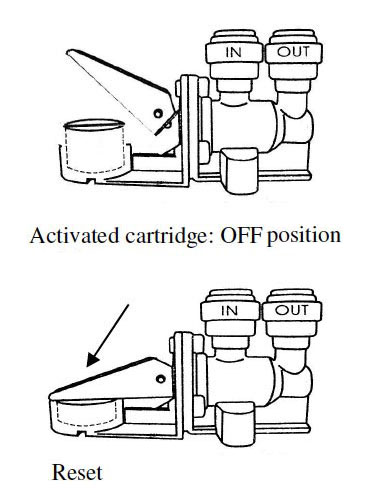
This model has a ProTekk leak stop valve built in. It is a mechanical leak valve installed on inlet water line and mounted inside the cabinet at the base on the right hand side filter compartment. (see below)
 To access the mechanical leak valve remove the 2 screws from the rear of the RHS panel and slide the panel back. To Reset after a leak:
- Remove any excess water in the bottom compartment
- Reset the leak valve by replacing expanded activation cartridge with new cartridge (a spare activation sponge is supplied with the cooler)
- Reset leak valve to open/ON position by pressing lever down
 NOTE: It is not necessary to remove the plastic wrapping from the replacement cartridge– install with bevel side down.
Filter Change Guide
The PWS-450STA has the eco3 valved, head filter cartridge system – an all-in-one filter cartridge system .
- Unplug the cooler from the wall socket. To access the filter compartment, remove the two screws that secure the Right side panel, slide panel back to access filter compartment.
- Remove the black tie wrap from housing and rotate the clamp ring clockwise to release housing. The filter housing has a built in valve, water flow will automatically shut off when cartridge is turned clockwise.
![]()
- Pull housing down and away from the head. The auto shut-off valves will stop the water flow.
![]()
- Push the black eco-Tool onto the cartridge ports and rotate in the direction of the OUT arrows, counter-clockwise for 1/8th turn until the stop is felt. Pull the cartridge upwards out of the housing. The black eco tool remains on the cartridge to seal the ports and prevent water leakage – dispose of with RC to recycle bin.
![]()
- Use the attached green eco-Tool to insert the new cartridge into the housing, aligning the cartridge arrow on the steel plate with the arrow on the outside of the housing. Push down and twist the cartridge 1/8th turn towards IN until the stop is felt. Remove the green eco-Tool from the new cartridge and dispose in plastic recycling bin.
 Push the housing up to the head aligning the arrow on the head with the arrow on the housing.
![]()
- Rotate the clamp ring counter-clockwise for 1/8th turn and fix with the new black housing tie. Apply the new date label and fill in the details of next service. NSF recommends that you flush at least 2 liters of water through the system.


